How to Connect a Domain with AWS Route 53 and AWS Lightsail

Introduction
In today’s digital age, having a strong online presence is crucial for businesses and individuals alike. One of the essential steps in establishing an online presence is connecting your domain to a reliable and scalable hosting service. Amazon Web Services (AWS) offers two powerful services for this purpose: AWS Route 53 for domain registration and management, and AWS Lightsail for hosting websites and applications. In this article, we will walk you through a step-by-step guide on how to connect your domain with AWS Route 53 and AWS Lightsail to get your website up and running efficiently.
Table of Contents
- Understanding Domain Registration
- Signing Up for Amazon Web Services (AWS)
- Setting Up AWS Route 53
- Creating a Hosted Zone
- Configuring DNS Records
- Getting Started with AWS Lightsail
- Creating a Lightsail Instance
- Setting Up Your Website
- Connecting Your Domain to AWS Lightsail
- Testing and Troubleshooting
- Checking DNS Propagation
- Troubleshooting Common Issues
- Security Considerations
- Implementing SSL Certificates
- Configuring Firewall Settings
- Monitoring and Scaling Your Website
- Backup and Disaster Recovery
- Conclusion
- FAQs
1. Understanding Domain Registration
Before diving into the technical aspects, it’s essential to have a registered domain name. If you don’t have one already, various domain registrars allow you to search for and purchase a domain that suits your brand or business.
2. Signing Up for Amazon Web Services (AWS)
To get started, you need an AWS account. If you already have one, you can skip this step. If not, head to the AWS website and sign up for an account. You’ll need to provide some basic information and a valid payment method.
3. Setting Up AWS Route 53
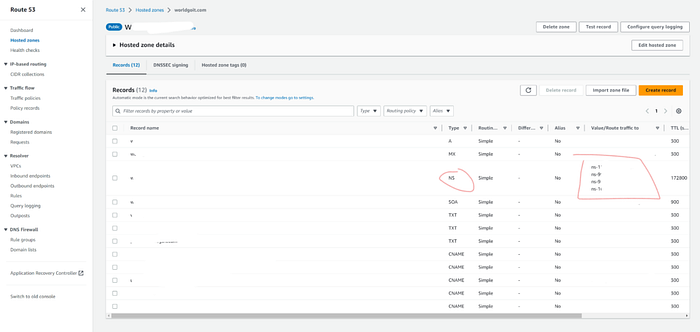
Creating a Hosted Zone
After signing in to your AWS Management Console, navigate to the Route 53 service. Here, you’ll create a hosted zone, which will act as the container for your domain’s DNS records. Click on “Create Hosted Zone” and follow the prompts. Remember to note down the four nameservers assigned by AWS; you’ll need them later to update your domain’s nameservers.
Configuring DNS Records
With your hosted zone set up, it’s time to configure the DNS records. This step involves adding records that map your domain to your desired AWS Lightsail instance’s IP address. Common records include A records (for IPv4 addresses) and CNAME records (for subdomains).
4. Getting Started with AWS Lightsail
Creating a Lightsail Instance
Once your domain’s DNS records are set up, head to the AWS Lightsail service. Click on “Create Instance” and choose your preferred operating system and instance plan. You can also select pre-configured applications based on your needs.
Setting Up Your Website
With your Lightsail instance up and running, you can now deploy your website or application. Access the instance via SSH or use the Lightsail browser-based terminal. Upload your website files and configure the necessary settings.
5. Connecting Your Domain to AWS Lightsail
To connect your domain to AWS Lightsail, you’ll need to update your domain’s nameservers with the ones provided by AWS Route 53 during the hosted zone setup. This process might take some time to propagate globally, but once it’s complete, your domain will point to your Lightsail instance.
Control NS(NameServer) in Route 53, not Lightsail DNS Zone!
At first, I couldn’t connect Domain with Route 53. Because I control Name Server in Lightsail DNS Zone. So I ignore(delete) Name Server in Lightsail DNS Zone and update Domain in Lightsail like Route 53. So please must write same NS only Route 53 and Lightsail Domain, not DNZ Zone!


route 53
6. Testing and Troubleshooting
After connecting your domain, thoroughly test your website to ensure everything works as expected. Additionally, learn about common issues and how to troubleshoot them. This includes checking for correct DNS settings and ensuring SSL certificates are set up correctly.
7. Security Considerations
Securing your website is paramount. Implement SSL certificates to enable HTTPS and encrypt data between your users and the server. Also, configure firewalls to restrict unauthorized access and protect sensitive information.
8. Monitoring and Scaling Your Website
To ensure your website performs optimally, monitor its performance regularly. AWS provides various monitoring tools to help you identify and address potential bottlenecks. If your website’s traffic increases significantly, consider scaling your AWS Lightsail instance to accommodate the demand.
9. Backup and Disaster Recovery
Don’t overlook the importance of data backup and disaster recovery. Set up automated backups of your website’s data to avoid data loss in case of any unfortunate events.
10. Conclusion
Congratulations! You’ve successfully connected your domain with AWS Route 53 and AWS Lightsail, creating a robust and scalable hosting environment for your website or application. By following the steps outlined in this article, you’ve taken a significant step towards establishing a reliable online presence.
FAQs
- Q: How long does it take for DNS propagation to complete? A: DNS propagation usually takes up to 48 hours to complete globally. However, it can be much quicker in some regions.
- Q: Can I use AWS Lightsail for more than just hosting a website? A: Yes, AWS Lightsail is versatile and can be used for various purposes, including hosting web applications, game servers, and more.
- Q: Do I need technical expertise to follow this guide? A: Basic knowledge of domain management and AWS services is helpful, but the guide is designed to be beginner-friendly.
- Q: Can I use an existing Lightsail instance with a new domain? A: Yes, you can associate an existing Lightsail instance with a new domain by updating the DNS records in AWS Route 53.
- Q: Is AWS Lightsail cost-effective? A: Yes, AWS Lightsail is known for its cost-effectiveness, providing various pricing plans to suit different needs.
